

Ever struggled with a messy, awkward kitchen corner? I have. And let me tell you-figuring out what to do with that space felt like solving a puzzle with missing pieces. That’s what pushed me to build my own corner kitchen pantry cabinet. It turned out to be one of the best home projects I’ve ever done. I looked into store options (and wow—how much is an IKEA kitchen these days?), but nothing quite fit. Plus, I wanted something that worked just right for my space.
So I got to work. Along the way, I learned a lot-like how deep pantry cabinets are supposed to be, and better ways to store things than a standard Lazy Susan. In this guide, I’ll show you how to build your pantry, step by step. I’ll also share how I organize mine, with ideas for pull-outs, deep drawers, and corner cabinet Lazy Susan alternatives that make sense.
Table of Contents
Why Corner Kitchen Pantry Cabinets Are a Game-Changer
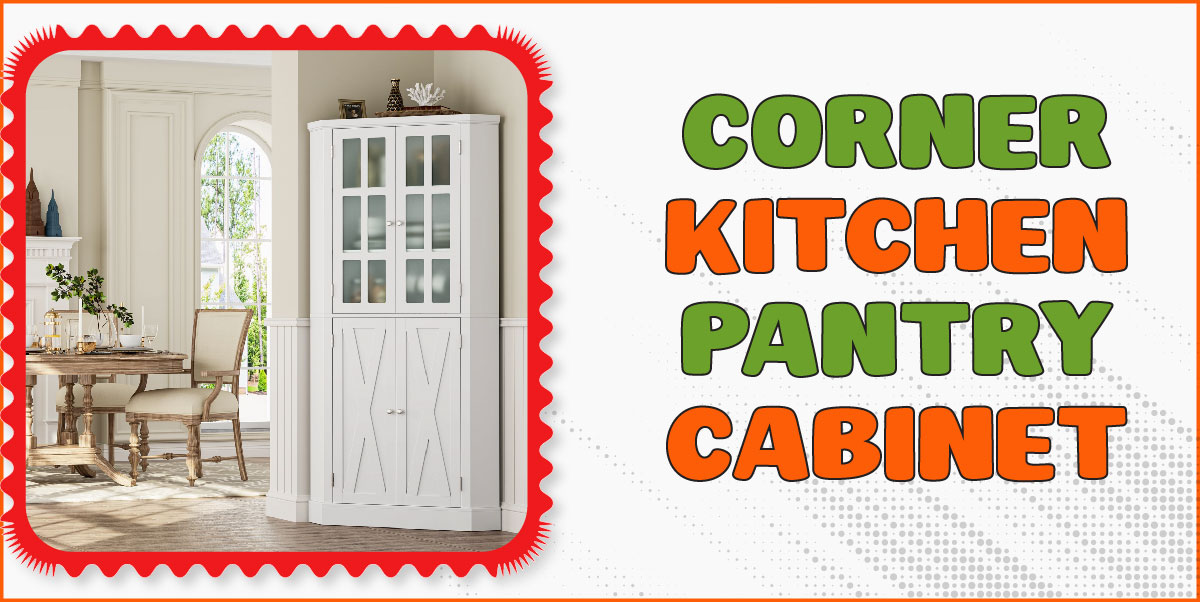
If you’ve ever stared at that weird, empty kitchen corner and thought, “What am I supposed to do with this?”-you’re not alone. For the longest time, mine was just a catch-all for forgotten snacks and a few dusty pots. But once I turned that space into a corner kitchen pantry cabinet, it completely changed how my kitchen worked.
I finally had a spot for all the stuff that never fit anywhere else. Corners can be tough to work with. Most people just stick it in a Lazy Susan and hope for the best. But there are better ways to use that space, especially if you design it around your needs. If your kitchen is small or has an odd layout, this is gold. That hidden corner suddenly becomes the MVP of the whole room.
I chose to build my own because I couldn’t find a ready-made one that fit right. (Also, let’s be real—how much is an IKEA kitchen these days?) I wanted shelves deep enough for big items, but not so deep that things got lost in the back. Plus, I could shape it around how I cook and store stuff.
What shocked me most? How much calmer my kitchen felt. There’s something about having a clean space where everything has a home. No more digging around for the blender or pushing cans aside to get to the oatmeal. It’s like clearing out mental clutter, too.
DIY vs. Store-Bought Pantry Cabinets
When I first looked at pantry options, I checked out the big stores. IKEA, Home Depot, and even local cabinet shops. But once I saw the prices, I had to sit down. I mean, how much is an IKEA kitchen now? Spoiler: It adds up fast.
Most prefab options looked nice. But none of them fit my weird corner. Some were too shallow. Some were too wide. Others had those huge Lazy Susans that spin like a game wheel but waste a ton of space.
That’s when I thought-why not build it myself? I had basic tools, some DIY grit, and a list of must-haves. Deep shelves. Easy access. Something that worked for my cooking routine.
Of course, making your own takes time. You’ve got to plan, measure, cut, and build. But honestly? I enjoyed the process. It felt good to solve a real problem with my own two hands.
How to Build a Corner Kitchen Pantry Cabinet (Step-by-Step)
Building a corner pantry cabinet might sound tricky, but don’t worry-if you can measure, cut, and screw things together, you’re halfway there. I’ll break it down into simple steps, just like I did in my own kitchen. No fancy shop or pro tools needed.
Tools & Materials You’ll Need
Start by gathering your tools. Here’s what I used:
- ¾-inch plywood (for the main box)
- 1x2s or 1x3s (for face frames)
- Pocket hole jig + screws
- Wood glue
- Clamps
- Drill and driver
- Circular saw or table saw
- Measuring tape
- Level
- Paint and primer
Optional upgrades: soft-close hinges, pull-out hardware, and cabinet-grade plywood for a cleaner finish.
Step 1 – Planning & Measurements
This part took me the longest. Every kitchen corner is different, especially if your walls aren’t perfectly square (mine weren’t).
Here’s what I did:
- Measured both wall lengths from the corner out
- Picked a depth that wouldn’t block the stove or fridge
- Decided between an L-shape or diagonal front based on what fit best
Personal Tip: Use painter’s tape on the floor to map the cabinet footprint. It helps you visualize and catch spacing issues early.
Step 2 – Building the Cabinet Box
Once you’ve got your plan, it’s time to build the carcass—or what I call the skeleton of the cabinet.
I cut side panels and a back panel out of ¾-inch plywood. For shelves, I cut pieces to fit inside snugly. Pocket holes and wood glue held everything together.
Since mine was an L-shape, I had to notch one shelf to fit tight into the corner. Not fancy, but it worked. If you go with a diagonal face, your cuts will be angled but still doable.
Step 3 – Adding Face Frames and Doors
I went with a simple shaker style—clean lines, easy to build. Face frames give the cabinet a polished look and help square up any small errors.
Quick Answer: Add a face frame using 1x2s or 1x3s, then hang doors using basic hinges or soft-close options.
I used pocket holes to attach the face frame to the cabinet box. Then I built doors from plywood with 1×3 frames glued on top to mimic the shaker style.
Tip: Leave a small gap between doors so they don’t rub in tight corners. And make sure your hinges are adjustable for alignment tweaks later.
Step 4 – Paint, Finishing & Installation
Here’s where your hard work comes to life. I primed and painted everything with cabinet-grade paint. I highly recommend a semi-gloss finish—it’s easy to clean and holds up well.
Quick Answer: Paint before final assembly for easier coverage, then install with shims to level.
I painted the panels before I put them together (learned that one the hard way). Then I slid it into the corner, leveled it with shims, and screwed it into wall studs.
Pantry Cabinet with Pull-Out Shelves – Worth It?
Let me tell you-when I first built my corner pantry, I skipped the pull-outs. Big mistake. I thought, “Eh, I’ll just stack stuff neatly.” Spoiler: that lasted about a week. Suddenly, I was crouching, reaching way back for canned tomatoes like I was spelunking in my own kitchen.
Pros & Cons of Pull-Out Shelves
Pull-outs are kind of like drawers for your pantry. You slide them out, grab what you need, and slide them back. No digging. No forgotten bags of quinoa lurking in the back.
Quick Pros:
- Easy to access everything—nothing gets lost
- Great for deep or lower shelves
- Makes organizing feel satisfying (seriously, it’s a vibe)
Some Cons:
- Adds cost and complexity
- Takes up a bit of space inside the cabinet
- Not all hardware holds up equally (ask me how I know…)
Real Talk: If you’re building from scratch, it’s easier to design pull-outs from the start. But even if you’re retrofitting, it’s totally doable.
My DIY Pull-Out Shelf Solution
I didn’t want to shell out for fancy hardware, so I came up with a workaround.
I used full-extension slides (about $10–15 per pair) and built simple boxes out of scrap plywood. I attached them to vertical runners inside the cabinet frame—kind of like a ladder with shelves that slide out.
They’re not showroom fancy, but they work so well. I use them for dry goods, snacks, and small appliances. No more crawling into corners like a raccoon.
Best Ready-Made Pull-Out Options
If you’d rather skip the DIY, there are some solid ready-to-install choices too.
- Rev-A-Shelf makes high-quality metal-and-wood systems that glide like butter.
- IKEA UTRUSTA has affordable metal baskets that pull out smoothly (just double-check sizing).
- SimpleHuman and HomeZone have organizers that fit inside existing shelves without needing screws.
Prices range from $30 to $200+, depending on size and materials. It’s more expensive than DIY-but if you want a plug-and-play upgrade, it’s worth it.
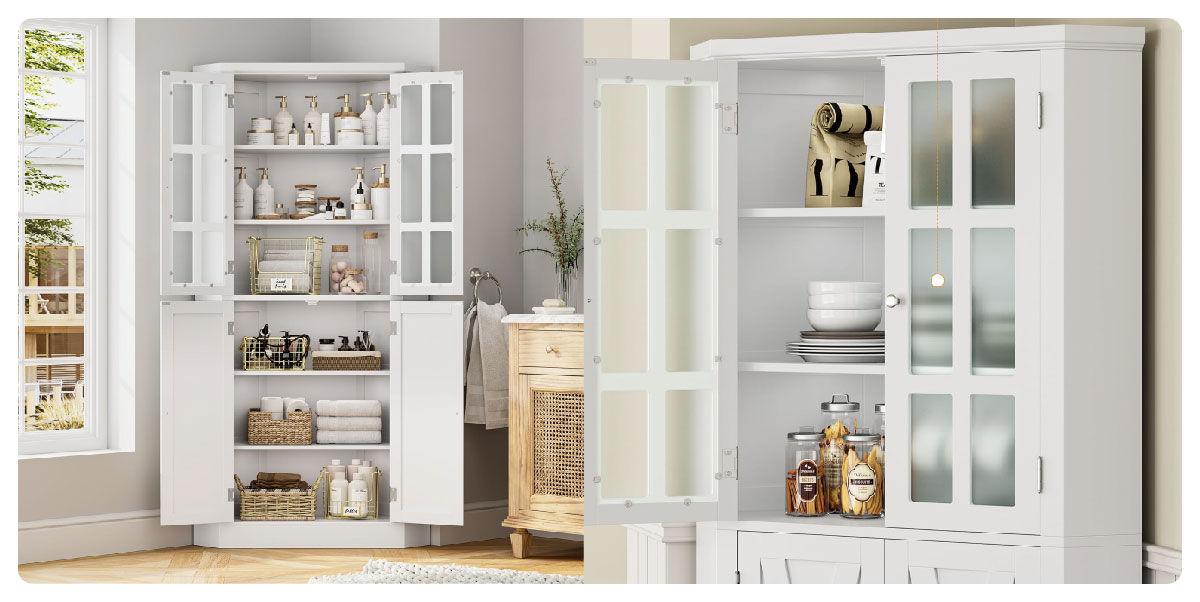
How to Organize a Corner Kitchen Cabinet
Let’s be honest-organizing a corner cabinet can feel like trying to clean out a junk drawer the size of a closet. You start with tidy rows and big plans. But in a few days? Chaos. I’ve been there. That deep, dark space turns into a black hole for snacks you forgot you had.
When I built my pantry, I knew I needed a better system. No more spinning trays that flung spice jars like a carnival ride. I wanted shelves that worked. Storage, I could see. Stuff I could grab without crawling inside like a raccoon.
Smart Layout Ideas
Here’s what helped me: I built wide, deep shelves that wrap into the corner. Then I added open bins to group things. One for snacks. One for baking stuff. Another for cans. I just slide a bin out, get what I need, and slide it back in.
I also skipped the classic Lazy Susan. Instead, I made angled shelves that reach into the corner but still let me see everything. If you like something that spins, try a corner cabinet Lazy Susan alternative with flat layers. It takes up less space and feels more stable.
Real Talk: It’s not about stuffing more in. It’s about grabbing what you need-fast.
Some people go next level with corner drawer kitchen cabinet ideas. These drawers pull out at an angle and use every inch. I love the concept, but they’re a bit tricky to build unless you’re up for a challenge.
Vertical Space Hacks
Corners are often tall and deep-hello, wasted space. I fixed that with adjustable shelves. That way, tall cereal boxes don’t sit next to short jars. You set the height to match your stuff.
I also use under-shelf baskets-those little wire ones that hang from the shelf above. I toss sandwich bags, napkins, and tea in there. They’re cheap and make a big difference. I also added tiered risers so I can see every can or jar in the back row.
Best Alternatives for Awkward Corners
Let’s be honest-corner cabinets can feel like black holes. Things go in and vanish. I didn’t want that. So I tried other ideas. And guess what? They worked. These options are simple, smart, and make your kitchen feel like it runs smoother.
Angled Corner Shelves
Instead of using a Lazy Susan, I built angled shelves. They slide right into the corner. It’s like solving a puzzle, but easier. You don’t waste space. And nothing gets stuck in the back.
Now I can grab what I need fast. Jars, cans, boxes-it’s all right there. No digging, no spinning. Plus, angled shelves look clean and feel solid.
Pull-Out Pantry Towers
I saw this idea online and gave it a try. A tall, thin pull-out shelf fits right in the corner. It holds snacks, sauces, or even baking stuff. I used strong slides and built the box from scrap wood.
It feels like a hidden drawer. You pull it out, grab what you need, and push it back. Easy. And way better than crawling into a dark cabinet.
Slim Vertical Drawers
Next to the face frame, I had a small gap. So I made a slim pull-out. It holds foil, wraps, and zip bags. I even built a second one for spices. I used simple wood rails and a tiered rack.
These tiny drawers pack a punch. They don’t take up much room. But they save me time every day. I never lose my spice jars now. And everything stays neat.
Corner Pantry Cabinet Ideas for Different Needs
Here’s the thing-no two kitchens are the same. What works in my space might not work in yours. That’s why I’m sharing different corner pantry ideas that I’ve tried (and loved), plus some that I’ve seen work wonders in friends’ homes. Let’s find the right one for your needs.
Counter-Height Storage Cabinets with Drawers
In my old apartment, I had almost zero pantry space. So I built a counter-height unit that tucked into the corner like it belonged there. It doubled as a prep surface and held all my dry goods in deep drawers.
It felt like having an island without the bulk. I used drawers instead of doors so I wouldn’t have to bend down and dig. It made cooking feel less like a chore and more like a rhythm. If you’re short on space, this kind of setup is gold.
Freestanding vs Built-In Pantry Cabinets
I’ve done both. When I rented, I bought a tall freestanding pantry that fit in the corner. It wasn’t fancy, but it got the job done. I even added baskets and risers to make it feel more organized.
Now that I own my home, I built a custom corner pantry cabinet that looks like it’s always been there. It’s flush with the walls and fits like a glove. If you’re staying long-term, it’s worth going built-in.
What I Like
I’ve spent a lot of time with this pantry setup, and let me tell you-there’s a lot to love. It’s one of those rare DIY projects that actually made my day-to-day cooking easier and more enjoyable. Here’s what stands out:
- It uses corner space perfectly. That awkward kitchen corner finally has a purpose. No more wasted space or clunky storage hacks. It fits like a glove and holds way more than I expected.
- It’s completely customizable. I got to choose the depth, shelf spacing, door style-everything. It fits my space, my style, and my workflow. No prefab cabinet could do that.
- It blends in with the kitchen. I made the face frame match my other cabinets. Now, the pantry doesn’t stand out—it belongs. It’s one of those things guests don’t even notice until I open it and they go, “Wait, what?!”
- It keeps everything organized. With a mix of deep shelves and pull-outs, I can actually find what I need. No more digging through a black hole of snacks.
- It saves money in the long run. I used quality materials and hardware, but still spent way less than buying a corner pantry from a store. And it’s holding up great.
What Could Be Better
I wouldn’t change much, but there are a few small things I’d tweak next time. These aren’t deal-breakers-just little lessons learned from doing it myself.
- The build takes time. Between planning, cutting, painting, and installing-it’s a commitment. If you’re new to DIY, give yourself more time than you think you’ll need.
- Paint before assembly. I learned this the hard way. Painting everything after it’s built? Not fun. Pre-painting the panels would have saved me a lot of crawling and touch-ups.
- Corner access is still a challenge. Even with angled shelves and pull-outs, corners are tricky by nature. It’s better than a Lazy Susan, but perfect? Not quite.
- Drawers need strong slides. I used budget slides at first and had to upgrade. Lesson learned: don’t skimp on hardware if you want things to glide smoothly for years.
My Personal Experience
I’ve been using this corner pantry for over two years now. I built it with my own hands, tested it through daily cooking, and tweaked it until it felt just right. It’s become one of my favorite things in the kitchen.
Design
From day one, I wanted a pantry that didn’t just work-I wanted it to look good too. So I used a shaker-style door to match my other cabinets and chose a soft gray paint that feels warm but modern. The angled shelves inside were my own little “why didn’t I do this sooner?” moment. They make everything visible without wasting space. People often don’t even realize it’s a pantry until they open it. That’s the magic-it’s functional, but it doesn’t shout for attention.
Performance
This pantry performs better than I expected. It holds more than I thought possible, and I don’t have to play Tetris every time I grocery shop. The pull-outs make it easy to grab stuff from the back. The shelves are deep enough for bulky items like flour bins and cereal boxes, but not so deep that I lose small things. Every inch feels used. It’s like the cabinet knows how I cook-what I reach for most, what I rarely use and it just flows.
Build Quality
I built this with quality plywood and pocket-hole joinery. The result? Solid. No wobbles. No creaks. The soft-close hinges still work like day one, and the paint has held up to all the bumps and scrapes of daily life. I’ve opened and closed those doors thousands of times by now, and they still feel strong. That tells me the extra effort during the build paid off. And honestly, that’s the difference between DIY and a quick store-bought solution—you get to build it right.
Final Thoughts
Looking back, I’m so glad I didn’t buy one off the shelf. Most store-bought cabinets didn’t fit my layout. Some were too wide. Others had those huge Lazy Susans that waste space. Building my pantry saved me money. More than that, it gave me a cabinet that fits my space just right.
There’s real pride in knowing, “Hey, I made this.” Every shelf fits. Every drawer opens how I want. I can grab what I need without digging or guessing. And I didn’t have to settle for something close-I built what worked best for me.
Read More: Ninja DZ401 vs DZ550 Air Fryer
FAQ
Is a corner kitchen pantry cabinet a good use of space?
Yes! It makes use of awkward corners that usually go to waste. You get more storage without losing floor space. Learn how to build your own step-by-step.
Can I build a corner pantry cabinet myself?
Absolutely. With basic tools and a little time, a DIY corner pantry is doable—even for beginners. Learn more in our complete guide with easy tips.
What should I store in a corner pantry cabinet?
Store snacks, baking goods, canned food, or small appliances. It keeps things neat and easy to find. Check out how I organize mine for daily use.
How do I make a corner pantry cabinet look built-in?
Use a matching face frame, paint, and trim. That way, it blends with your kitchen like it was always there. I’ll show you how I did it in my project.
What are the best shelves for a corner pantry cabinet?
Angled or pull-out shelves work great. They help you reach things in deep spots. See the shelf setup I used and how it changed my kitchen routine.